1-820-333-2571
How do I stop automatic updates on Windows 10?
How to Disable or Turn Off Windows Update in Windows 10
Microsoft has made it mandatory for Windows 10 users to update their computer. The company has set the new operating system to automatically receive new updates by default. Windows 10 Pro users have an option to delay the updates they receive, but if you are on Windows 10 Home, there is not much you can do about it.
Top 3 Ways to Disable Automatic Windows 10 Update
The following are 3 main solutions to stop the annoying Windows cumulative updates in December 2017 on your Windows 10 Fall Creators Update. Way 1 applies to computers that run Windows 10 Enterprise, Education or Professional edition. If you run Windows 10 Home edition, you can go to Way 2 or Way 3 directly.
Way 1. Prevent Windows 10 Update by Changing Settings in Local Group Policy Editor
Follow the steps below to change the configure automatic updating in Group Policy Editor:
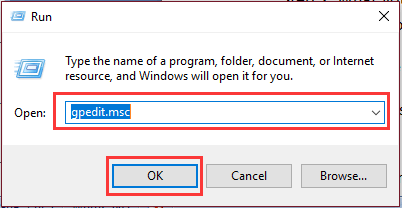
Step 1. Use Windows shortcut keys Win + R to launch Run.
Step 2. Type into gpedit.msc and hit the Enter key.
Step 3. Expand the Computer Configuration entry.
Step 4. The expand the folders Administrative Templates, Windows Components, Windows Update in order.
Step 5. Highlight the Windows Update folder and double-click the setting Configure Automatic Updates on the right pane.
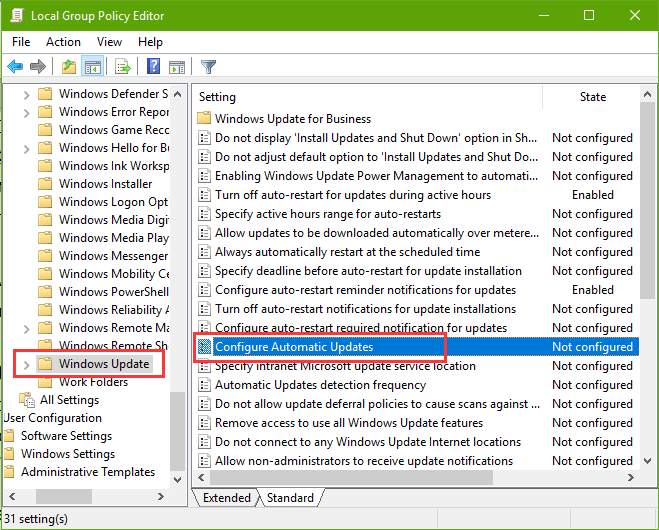
Step 6. Choose the Enabled option and go to the Options box.
Here we recommend you read the Help information on the right side to learn about the items in the drop-down menu of Configure automatic updating. To disable Windows to automatically install updates, you can select 2 - Notify for download and notify for install.
Step 7. Change the Scheduled install day and time as you like.
Step 8. Click the Apply and the OK button.

Way 2. Disable Automatic Windows 10 Update in Service
To disable Windows 10 from automatically installing updates, you can disable the Windows Update services:
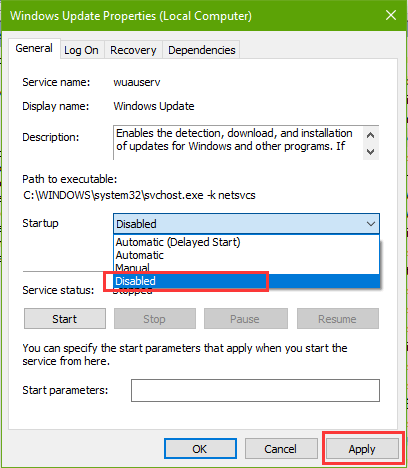
Step 1. Use Win + R to launch Run. Type into services.msc and hit the key Enter.
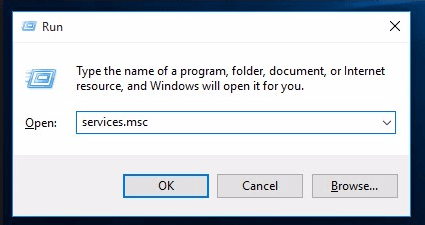
Step 2. Navigate the service Windows Update and double-click it.
Step 3. Select the Disabled from the drop-down menu of Startup. Click the Apply button.
Step 4. Go to the Recovery tab. Select the Take No Action from the drop-down menu of First failure.
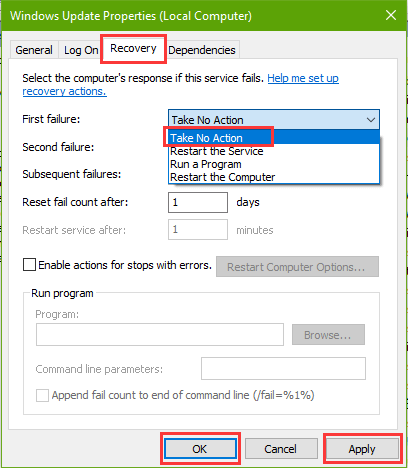
Step 5. Click the Apply button and the OK button.
Way 3. Stop Windows 10 Update via Modifying Registry
Also, you can disable the Windows 10 updates by changing the Registry.
Step 1. Open the Run on Windows.
Step 2. Enter regedit and click the OK button.
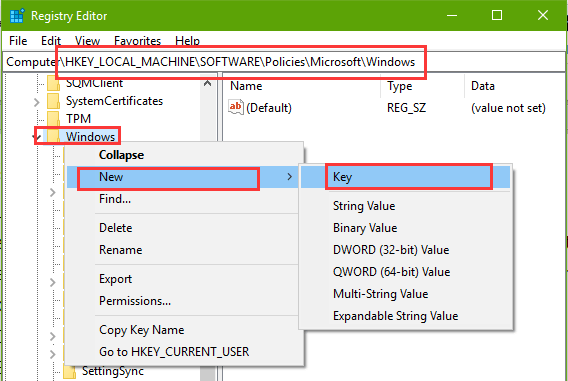
Step 3. Paste the path to the address bar:
HKEY_LOCAL_MACHINE\SOFTWARE\Policies\Microsoft\Windows
Step 4. Highlight and right-click the Windows key. Move to New and click Key on the submenu.
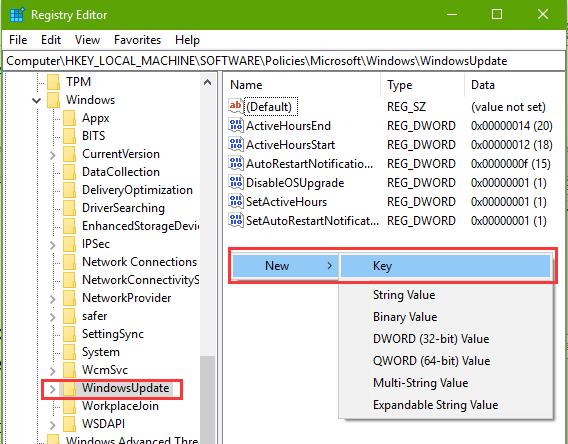
Step 5. Name this new key WindowsUpdate and highlight it. (Note: If there is already such key under the Windows key, just highlight it.)
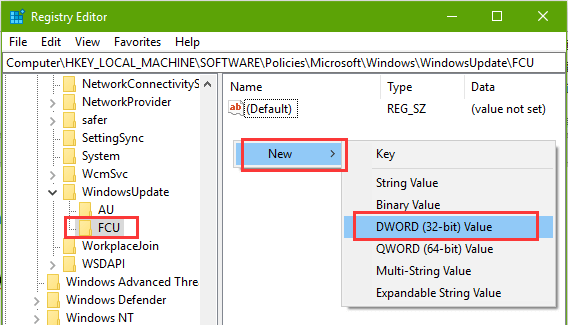
Step 6. On the right side, you will see names of WindowsUpdate. Right-click any blank area and move to the New to choose Key.
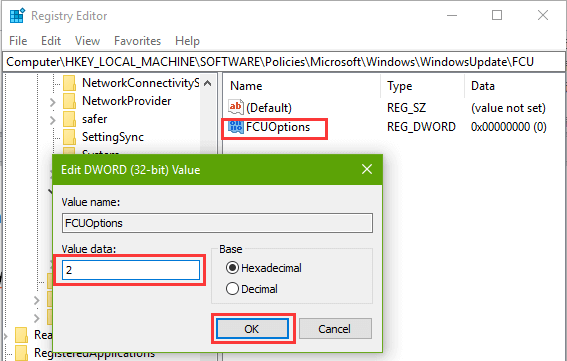
Step 7. Name this new key FCU and highlight it.
Step 8. On the right pane of FCU, right-click any blank area and move to New to select DWORD (32-bit) Value.
Step 9. Name the new key FCUOptions.
Step 10. Double-click the key FCUOptions and change the Value data to 2 or 4. (Note: The value stands for the same options you see in the Local Group Policy in Way 1.) Click OK.