 1-820-333-2571
Microsoft Edgle and Spell Checker Not Working Want to Fix It now
Microsoft Spell Checker Not Working for a Specific Document
There are times you’ll find Word’s spell check just won’t work for one document. You can open other files and spell check works. In these instances, the problem probably resides with the selected document language or formatting.
Verify Your Language & Check Spelling Options
-
- Open the problem document.
- Press the Ctrl+A keys to select the entire text.
- From the Review tab, select Language then Set Proofing Language…
- In the Language dialog make sure the correct language is selected.
- Verify the checkbox Do not check spelling or grammar is unchecked.
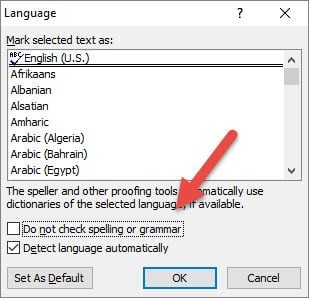
- Click OK.
- Recheck your document.
I wish I could say the above method is foolproof. On occasion after following the above steps, I get the following message as shown below.
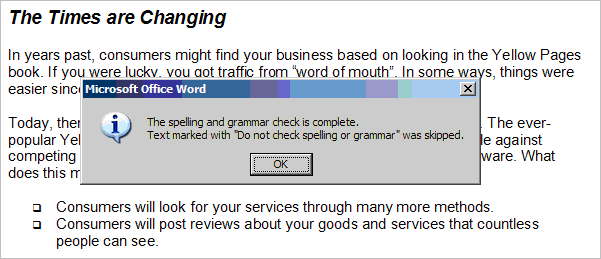
This message suggests your document still has a section that is marked with “Do not check spelling or grammar“. I don’t know of any easy way to find these marks. Instead, I tend to find a paragraph with a misspelling, highlight it and press Shift + F1.
This opens the Reveal Formatting pane where you can verify your language (1) is what you expect and (2) if the paragraph has spell check turned off. In the example below, you can see the highlighted paragraph is coded not to check for spelling.

Check Your Proofing Exception Options
There is one other setting you probably should check as there is a file option in Word where you can elect to hide spelling errors. This setting is done on an a file by file basis.
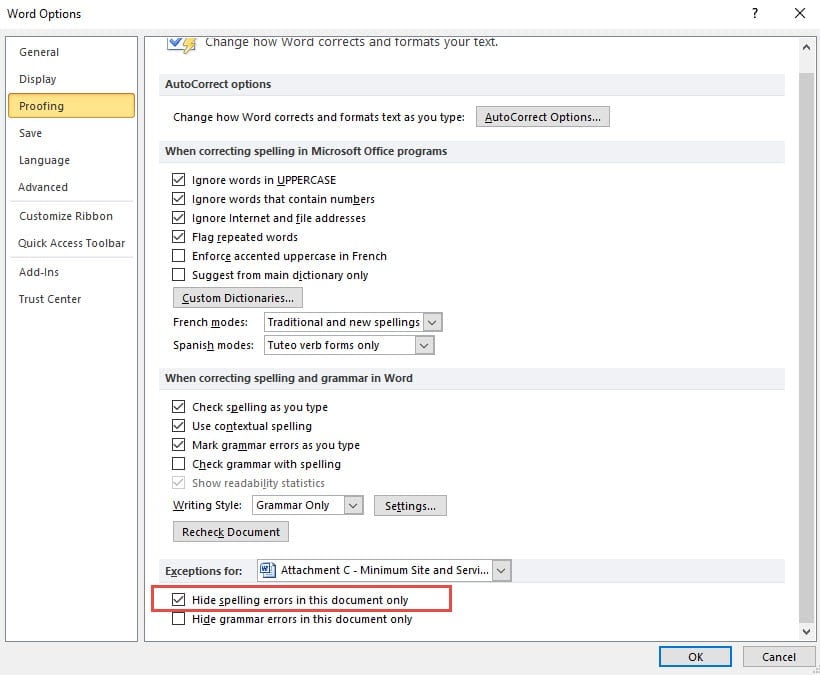
- From the File tab, select Options.
- From the left panel, select Options.
- In the Word Options dialog, click Proofing.
- Scroll to the bottom area called Exceptions for:
- Check to see if the Hide spelling errors in this document only is enabled.
Problem 2: Spell Check Doesn’t Work For Any Documents
This second problem can be a real annoyance with many variations. The suggestions range from easy to a registry change.
Solution 1: Verify the “check spelling as you type” feature is on
To verify Spelling and Grammar Checkers are on,
- From the Review tab, click Spelling & Grammar
- In the Spelling and Grammar: dialog, click the Options… button.
- In the Word Options dialog, check the boxes for Check spelling as you type and Mark grammar errors as you type.
- Click OK.
Solution 2: Verify Another Word Add-in Isn’t Interfering
Your problem may be caused by a combination of factors such as another Word add-in. The way to verify this is to see if spell-check works in “safe mode”. Safe Mode is a reduced functionality state where Microsoft Word loads without add-ins.
- Hold down your Ctrl key and the press the icon or menu option for Word.
- Click Yes when the Safe Mode dialog appears.
- Open up an existing document.
- Press F7 to run spell check.
Solution 3: Rename Your Word Template
It could be that your problem is tied to your global template which is either normal.dot or normal.dotm for Word 2007. These files are usually found in your MicrosoftTemplates folder. When you rename the template, Word will reset itself to the default settings.
Because your global template file has your settings, I would rename the file to something like normalPRV.dot or normalPRV.dotm so you can change the name back if this suggestion doesn’t work.
Solution 4: Try Detect and Repair
Every now and then, I have the spell-check feature go wonky after some other software update or hardware change. I suspect some registry entry has become corrupted. In these rare cases, you may be able to solve the problem using the built-in Detect and Repair… feature. In Word 2007, this is called Diagnose. Before running this utility, make sure you have your installation media as you may be prompted for a CD.
Solution 5: Rename a Windows Registry Folder
I don’t like giving instruction on using the Windows registry. But sometimes, the solution lies in this area. If you’re not familiar with this area, I strongly recommend you read Microsoft’s Windows registry information for advanced users.
As with an earlier suggestion, I rename the folder rather than deleting it. Some people rely on third-party dictionaries that may use some of these entries. If you find after renaming the folder your 3rd party dictionary doesn’t work, you can revert the changes.
To rename the Proofing Tools folder,
- Close Word
- Click the Start button
- Click Run…
- Type regedit
- Click OK
- Expand the left pane to HKEY_CURRENT_USER | Software | Microsoft | SharedTools | Proofing Tools
- Right-click the folder named 1.0
- Select Rename from the menu
- Rename folder to 1PRV.0
- Close regedit.
- Restart Word.
Related Faqs or Tags: microsoft word spell check not working,microsoft word spell check not working mac,microsoft word spell checker not working,microsoft word spell check not working in parts of document,spell check not working in word 2016 mac.
How to quickly fix problems with Microsoft Edge not working on Windows 10
How to repair Microsoft Edge on Windows 10
-
Open Settings.
-
Click on Apps.
-
Click on Apps & features.
-
Select Microsoft Edge from the list.
-
Click on the Advanced options link

6.Click the Repair button to try and fix Microsoft Edge if it’s not working correctly without affecting your browser data.

Once you completed the steps, open Microsoft Edge and it should now work as expected and all without using complex commands or complicated workarounds.
How To Reset Microsoft Edge on Windows 10
-
Open Settings.
-
Click on Apps.
-
Click on Apps & features.
-
Select Microsoft Edge from the list.
-
Click on the Advanced options link.
6.Click the Reset button. This process will delete your history, cookies, settings, and the application will reset. However, your favorites will be kept.
Once reset is complete, Microsoft Edge should start working again as if it was the first time.
How To Re install Microsoft Edge on Windows 10
In the rare case that you can’t find Microsoft Edge after a reset, use these steps to reinstall the browser:
-
Open Start.
-
Search for Windows PowerShell, right-click the result, and select Run as administrator.
-
Copy and paste, or type the following command and press Enter:
-
Get-AppXPackage -AllUsers -Name Microsoft.MicrosoftEdge | Foreach
-
{Add-AppxPackage -DisableDevelopmentMode -Register -
“$($_.InstallLocation)\AppXManifest.xml” -Verbose}
-
After completing the steps, Microsoft Edge will reinstall again on your computer.
Related Faqs or Tags: microsoft edge not working,microsoft edge not working but chrome is,microsoft edge not working in windows 10,microsoft edge not working after creators update,microsoft edge not working on administrator account,microsoft edge not working xbox,microsoft edge not working on pc windows 10.